tuturiol
My linux setup
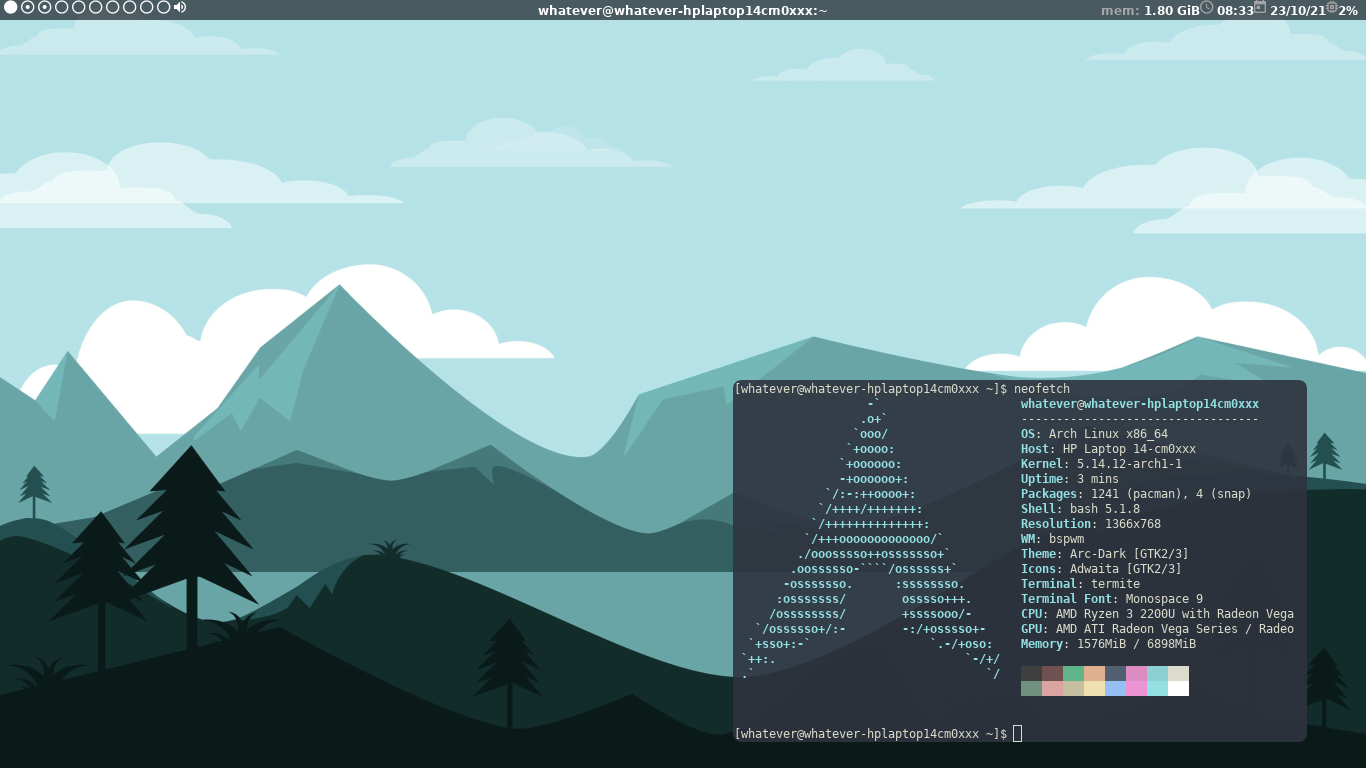
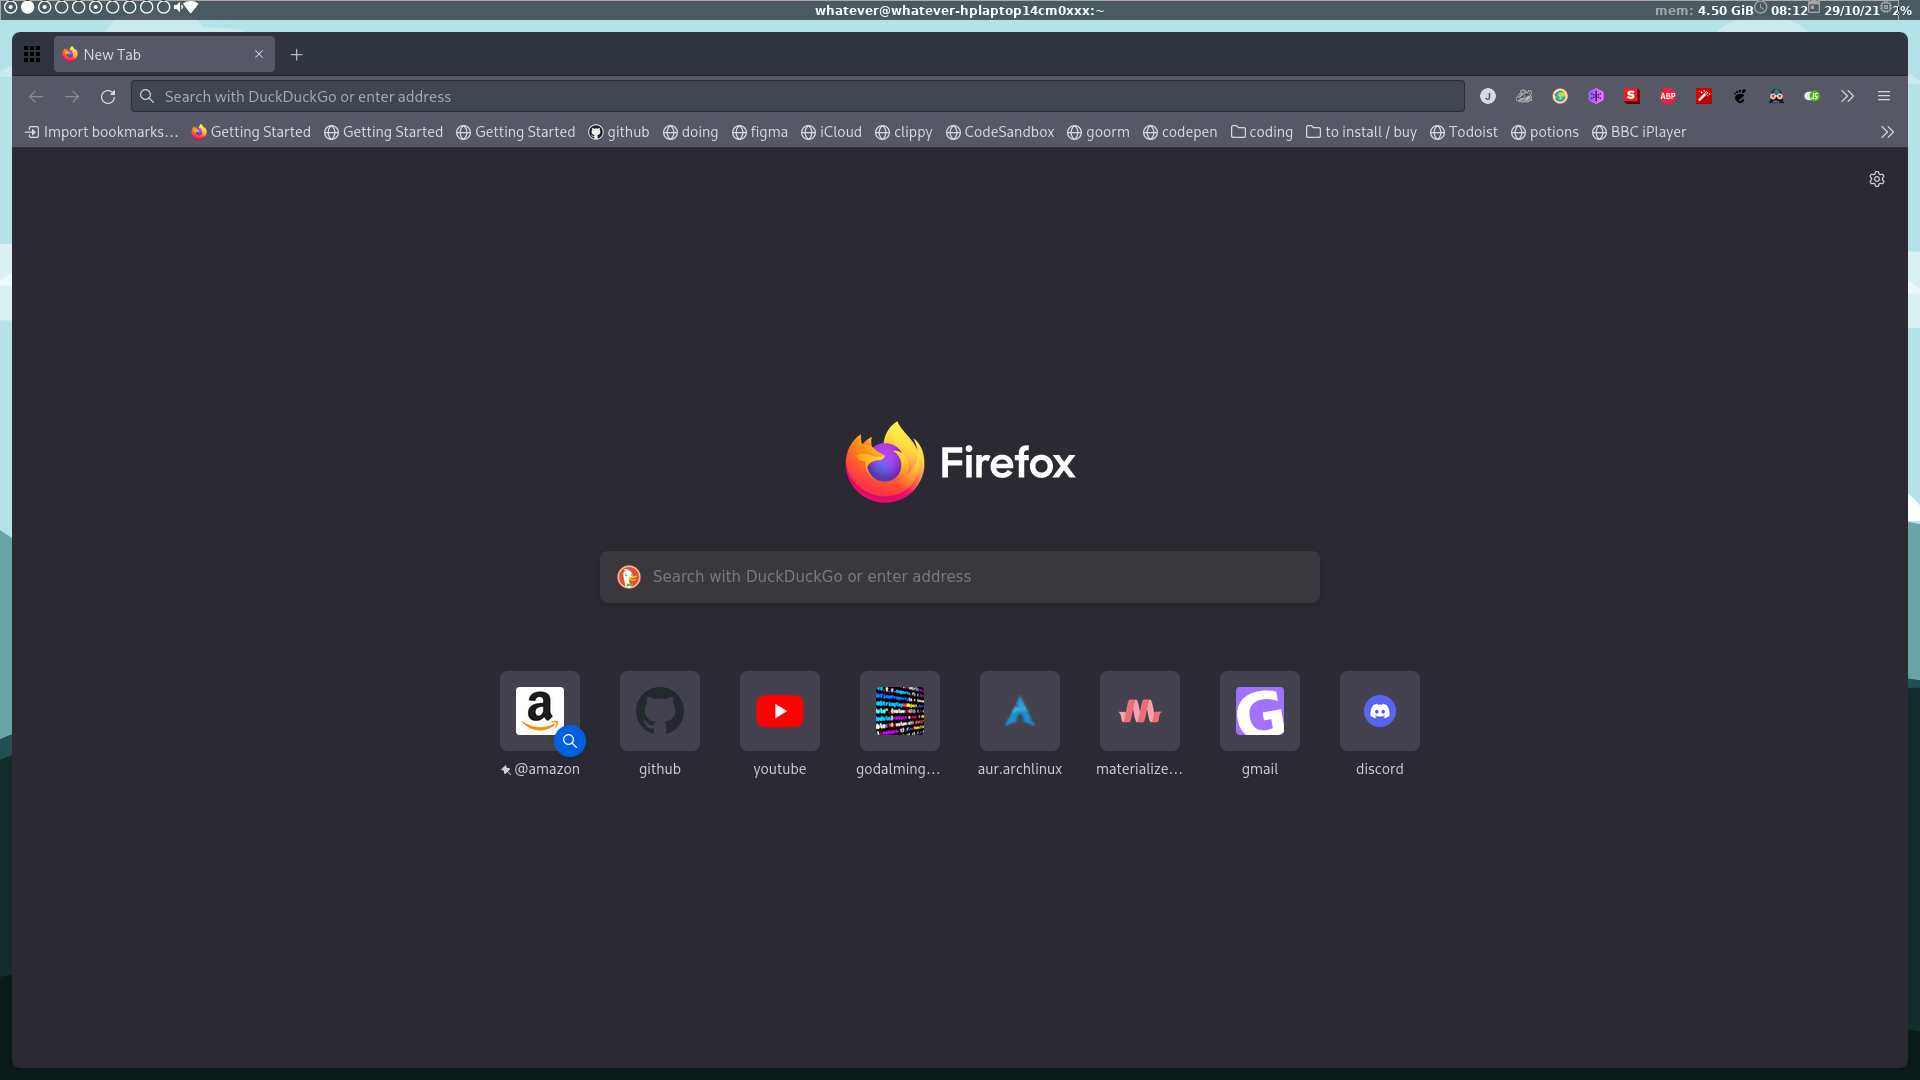
Screenshots
These are some screenshots of my setup:
Starting piont
For this article I am assuming that you are starting with:
- working terminal installation of arch-based distro
- sudo setup
Mailing List Hot Incoming
Our mailing list is hot incoming and will be arriving soon. So remember to check here!
Distro
Currently I use Endevour but I plan to install arch next time I install a distro I just tried endeavour to try arch witout the installation hastle. And I loved it ❤️️! I could find any packadge I wanted with yay and pacman, it was fluid and performant, it was customizable and vanialla and the list goes on. …and on …and on …FOREVER.
UPDATE!
I have created a (new dotfiles location)[https://https://github.com/godalming123/dotfiles] it contains all my old dotfiles in 0 - I don't use anymore and a (script to setup my wayfire setup)[https://github.com/godalming123/dotfiles/blob/master/1-install/everything.sh] this is most likely to work but is not tested and will not work in VM’s due to wayland issues it will overide some config directory’s so it is recomeneded to install to a blank terminal system. The dotfiles in the code blocks still work but are outdated.
Basic script for setup
Just run these commands to setup bspwm with my taste
mkdir Downloads/
cd Downloads/
curl -o setup-everything.sh https://godalming123.github.io/blog/files/linux-setup/everything.sh
chmod a+x everything.sh
bash everything.sh
Software
Git
sudo pacman -S git
Yay or paru
I use yay as an aur helper but am experimenting with paru and its what makes arch great anyway.
Yay install
git clone https://aur.archlinux.org/yay-git.git
cd yay-git/
makepkg -si
Finally we must remove the yay-git directory
cd ../
rmdir yay-git/
Paru install
sudo pacman -S --needed base-devel
git clone https://aur.archlinux.org/paru.git
cd paru
makepkg -si
And to remove the paru folders
cd ../
rmdir paru/
Flameshot
pacman -S flameshot
Micro
Installation
pacman -S micro
Configuration
Open micro type ctrl + e and then
set colorscheme cm16
Termite or alacritty
I use termite as my terminal emulater however have decided to update to alacritty.
Termite
yay -S termite
Alacritty
Installation
sudo pacman -S alacritty
Configuration
~/.config/alacritty/alacritty.yml
background_opacity: 0.9

colors:
    primary:
        background: "#2f343f"
Gnome-boxes
Please dont judge me and hear me out; gnome boxes should be faster then virtualbox becuase it uses qemu which is built into the linux kernal and its got a better and cleaner interface respecting my arc gtk theme where virtualbox just looks ugly as well as automatically adapting my virtual machine size when I resize the window.
sudo pacman -S gnome-boxes
Nautilus
sudo pacman -S nautilus
Vscodium
yay -S vscodium-bin
Btop++
yay -S btop
Jekyll + ruby
yay -S jekyll
Firefox
pacman -S firefox
Github-desktop
Installation
yay -S github-desktop-bin
Configuration
- Press
ctrl+,on your keyboard to enter the acounts configuration menu. - Press sign in under the github.com subheading.
- Click continue in browser to open a browser verefecation session.
- This should open your browser login to github if requiered.
- Then select github desktop to open the smart link. And your done!
Teams
yay -S teams
Discord
yay -S discord-development
Neofetch
sudo pacman -S neofetch
Login manager
I use lightdm for my login manager just run:
sudo pacman -S lightdm lightdm-gtk-greeter
sudo systemctl enable lightdm
Please note if you reboot into lightdm this will fail as there are no desktop enviroments to boot into. So you must install a DE.
Theming
Arc
sudo pacman -S arc-gtk-theme
Mailing List Hot Incoming
Our mailing list is hot incoming and will be arriving soon. So remember to check here!
Wm
I use bspwm + sxhkd + polybar + picom + rofi and dunst for my gui setup.
Installation
Just run
sudo pacman -S xorg bspwm sxhkd polybar picom rofi dunst
Configuration
Bspwm
My bspwm config is:
~/.config/bspwm/baspwmrc
#! /bin/sh

# =========================================================
# startup
# =========================================================

bash ~/.screenlayout/workstation.sh

picom -f &
pgrep -x sxhkd > /dev/null || sxhkd &
bash ~/.config/polybar/launch.sh &
bspc monitor HDMI-1 -d 1 2 3 4 5 6 7 #HDMI
bspc monitor eDP-1 -d 8 9 10 #laptop screen

# =========================================================
# options
# =========================================================

bspc config border_width        0
bspc config window_gap          12

bspc config split_ratio          0.52
bspc config borderless_monocle   true
bspc config gapless_monocle      true

bspc rule -a Gimp desktop='^8' state=floating follow=on
bspc rule -a Chromium desktop='^2'
bspc rule -a mplayer2 state=floating
bspc rule -a Kupfer.py focus=on
bspc rule -a Screenkey manage=off
For this file to work we need to add ~/.screenlayout/workstation.sh what this file does is sets up my laptop so the external moniter I have plugged in is set as a primary moniter and here is the file contents:
~/.screenlayout/workstation.sh
#!/bin/sh
xrandr --output eDP-1 --mode 1366x768 --pos 0x0 --rotate normal --output HDMI-1 --primary --mode 1920x1080 --pos 1366x0 --rotate normal
Sxhkd
Next we need to setup our sxhkd config I generally do not like have hotkeys directly linking to an app like super + w = browser instead I prefer to use rofi to do that the only binding I have to an app is super + enter = terminal - just because the number of times I’m following a guide and have to open the terminal is crazy. I also believe that keys should be bound to somethink that is easily useable. EG: super + l for left, r for right, u for up and d for down may be intuitive but hard to use as you have to do hand gymnastics to change window focus even if those keybindings are easy to learn. Instead I believe in keybindings being quik all my keybinds are centered around super + wasd this is my keybinding for changing window focus and super + shift + wasd would move windows and super + q would kill and super + e would open rofi and so on. This allows me to easily navigate my window manager from one hand while the other can be using the mouse or typing. Anyways this is my config:
~/.config/sxhkd/sxhkdrc
#1. Wm independent hotkeys
	#1. terminal
	#2. launcher
	#3. screenshots
	#4. relead sxhkd
	#5. lock screen and sleep

#2. Bspwm hotkeys
	#1. General
		#1. Quit bspwm to login screen
		#2. close window
		#3. Alternate between tiled and monocule layout
		#4. send the newest marked node to the newest preselected node
		#5. swap the current node and the biggest window
	#2. State/flags
		#1. Set window state
		#2. Set the node flags
	#3. Focus/swap
		#1. move focus in given direction
		#2. focus the node for the given path jump
		#3. next/previous desktop in current moniter
		#4. focus the last node/desktop
		#5. focus the older or newer node in the focus history
		#6. focus or send to the given desktop
	#4. Preselect
		#1. preselect the direction
		#2. preselect the ratio
		#3. cancel the preselection for the focused node
		#4. cancel the preselection for the focused desktop
	#5. Move/resize
		#1. expand a window by moving one of its side outward
		#2. contract a window by moving one of its side inward
		#3. move a floating window

# ---------------------------
# 1. wm independent hotkeys
# ---------------------------

# 1. 1. terminal emulator --------
super + Return
	alacritty

# 1. 2. program launcher --------
super + e
	rofi -show run

# 1. 3. screenshots -------------
super + p
    flameshot gui

# 1. 4. sxhkd relead --------
super + Escape
	pkill -USR1 -x sxhkd

# 1. 5. lock screen and sleep ----
super + x
	env dm-tool switch-to-greeter & systemctl -i suspend

# -----------------------
# 2. bspwm hotkeys
# -----------------------

#
# 2. 1. general ------------
#

# 2. 1. 1. quit/restart bspwm ------
super + shift + e
	bspc {quit,wm -r}

# 2. 1. 2. close and kill bspwm --
super + {_,shift + }q
	bspc node -{c,k}

# 2. 1. 3. alternate between the tiled and monocle layout
super + shift + f
	bspc desktop -l next

# 2. 1. 4. send the newest marked node to the newest preselected node
super + y
	bspc node newest.marked.local -n newest.!automatic.local

# 2. 1. 5. swap the current node and the biggest window
super + g
	bspc node -s biggest.window

#
# 2. 2. state/flags -------------------
#

# 2. 2. 1. set the window state
super + {t,shift + j,k,l}
	bspc node -t {tiled,pseudo_tiled,floating,fullscreen}

# 2. 2. 2. set the node flags
super + ctrl + {m,x,y,z}
	bspc node -g {marked,locked,sticky,private}

#
# 2. 3. focus/swap -----------
#

# 2. 3. 1. focus the node in the given direction
super + {_,shift + }{w,a,s,d}
	bspc node -{f,s} {north, west, south, east}

# 2. 3. 2. focus the node for the given path jump
super + {p,b,comma,period}
	bspc node -f @{parent,brother,first,second}

# 2. 3. 3. focus the next/previous desktop in the current monitor
super + bracket{left,right}
	bspc desktop -f {prev,next}.local

# 2. 3. 4. focus the last node/desktop
super + {grave,Tab}
	bspc {node,desktop} -f last

# 2. 3. 5. focus the older or newer node in the focus history
super + {o,i}
	bspc wm -h off; \
	bspc node {older,newer} -f; \
	bspc wm -h on

# 2. 3. 6. focus or send to the given desktop
super + {_,shift + }{1-9,0}
	bspc {desktop -f,node -d} '^{1-9,10}'

#
# 2. 4. preselect ------------
#

# 2. 4. 1. preselect the direction
super + ctrl + {w,a,s,d}
	bspc node -p {north, west, south, east}

# 2. 4. 2. preselect the ratio
super + ctrl + {1-9}
	bspc node -o 0.{1-9}

# 2. 4. 3. cancel the preselection for the focused node
super + ctrl + space
	bspc node -p cancel

# 2. 4. 4. cancel the preselection for the focused desktop
super + ctrl + Escape
	bspc query -N -d | xargs -I id -n 1 bspc node id -p cancel

#
# 2. 5. move/resize ---------------
#

# 2. 5. 1. expand a window by moving one of its side outward
super + alt + {w,a,s,d}
	bspc node -z {top -20 0,left 0 20,bottom 0 -20,right 20 0}

# 2. 5. 2. contract a window by moving one of its side inward
super + alt + shift + {h,j,k,l}
	bspc node -z {right -20 0,top 0 20,bottom 0 -20,left 20 0}

# 2. 5. 3. move a floating window
super + {Left,Down,Up,Right}
	bspc node -v {-20 0,0 20,0 -20,20 0}
Picom
Next we need to cofigure picom as you can already see from my bspwmrc I use picoms window fade feature so theres a nice animation when I open a window I also use rounded corners which can be set by the round-corners varieble.
~/.config/picom/picom.conf
corner-radius = 8;
rounded-corners-exclude = [
    "class_g = 'polybar'",
    "window_type = 'dock'",
];
round-borders = 1;
detect-rounded-corners = true;
Polybar
Next we need to configure polybar I use a fixed top bar and the matirial icons font. To install this font run:
sudo mkdir     /usr/share/fonts/TTF/
sudo curl -o   /usr/share/fonts/TTF/Material-Design-Iconic-Font.ttf https://godalming123.github.io/blog/files/linux-setup/configs/Material-Design-Iconic-Font.ttf
Now that we’ve installed the necersarry fonts for my polybar config lets set it up.
First we need a launch file:
~/.config/polybar/launch.sh
#!/usr/bin/env bash

# Terminate already running bar instances
killall -q polybar
# If all your bars have ipc enabled, you can also use
# polybar-msg cmd quit

# Launch main bar
echo "---" | tee -a /tmp/polybar1.log /tmp/polybar2.log
#polybar black >>/tmp/polybar1.log 2>&1 & disown
polybar main -r >>/tmp/polybar1.log 2>&1 & disown
echo "Bars launched..."
And then we need my config:
~/.config/polybar/config
;==========================================================
;
;
;██████╗ ██████╗ ██╗ ██╗ ██╗██████╗ █████╗ ██████╗
; ██╔══██╗██╔═══██╗██║ ╚██╗ ██╔╝██╔══██╗██╔══██╗██╔══██╗
; ██████╔╝██║ ██║██║ ╚████╔╝ ██████╔╝███████║██████╔╝
; ██╔═══╝ ██║ ██║██║ ╚██╔╝ ██╔══██╗██╔══██║██╔══██╗
; ██║ ╚██████╔╝███████╗██║ ██████╔╝██║ ██║██║ ██║
; ╚═╝ ╚═════╝ ╚══════╝╚═╝ ╚═════╝ ╚═╝ ╚═╝╚═╝ ╚═╝
;
;
; To learn more about how to configure Polybar
; go to https://github.com/polybar/polybar
;
; The README contains a lot of information
;
;==========================================================
;==========================================================
;colors
;==========================================================
[colors]
bg = #aa14171d
fg = #ffffff
fg-slight-fade = #d3d3d3
fg-faded = #a5a5a5
accent = #008c77
;==========================================================
;main bar
;==========================================================
[bar/main]
; appearence ==============================================
height = 20
background = ${colors.bg}
foreground = ${colors.fg}
padding-left = 1
padding-right = 1
; location ================================================
bottom = false
monitor =
; shape ===================================================
; docked styles
width = 100%
; floating styles:
;width = 99%
;offset-x = 0.5%
;offset-y = 0.5%
;radius = 16
; random =================================================
line-size = 1
wm-restack = bspwm
; contents ================================================
modules-left = workspaces pulseaudio wlan
modules-center = title
modules-right = memory time date cpu cpuMem
; fonts ===================================================
font-0 = JetBrainsMono Nerd Font:style=Bold:pixelsize=9;3
font-1 = Material\-Design\-Iconic\-Font:style=Design-Iconic-Font
font-2 = unifont:fontformat=truetype:size=9;3
;==========================================================
; modules
;==========================================================
; date ===================================================
[module/date]
type = internal/date
interval = 1000
format = <label>
format-prefix = " "
format-prefix-foreground = ${colors.fg-faded}
label = %time%
time = %d/%m/%g
; time ===================================================
[module/time]
type = internal/date
interval = 60
format = <label>
format-prefix=" "
format-prefix-foreground=${colors.fg-faded}
label = %time%
time = %H:%M%{F-}
; memory ===========================================
[module/memory]
type = internal/memory
interval = 2
format-prefix = "mem: "
format-prefix-foreground = ${colors.fg-faded}
format = <label>
label = %gb_used%
; wireless ==============================================
[module/wlan]
type = internal/network
interface = wlan0
interval = 3.0
format-connected = <label-connected>
label-connected = ""
; cpu and mem ================================
[module/cpuMem]
type = internal/cpu internal/memory
interval = 2
format-prefix=""
format-prefix-foreground = ${colors.fg-faded}
format = <label>
label = %percentage%%, %gb_used%
; cpu ==========================================
[module/cpu]
type = internal/cpu
interval = 2.0
format-prefix=""
format-prefix-foreground = ${colors.fg-faded}
format = <label>
label = "%percentage%% "
; window title ======================================
[module/title]
type = internal/xwindow
format = <label>
label-maxlen = 60
label-empty = ""
; audio volume ================================
[module/pulseaudio]
type = internal/pulseaudio
sink = alsa_output.pci-0000_03_00.6.analog-stereo
interval = 5
format-volume = <ramp-volume>
format-muted = <label-muted>
label-muted = ""
ramp-volume-0 =
ramp-volume-1 =
ramp-volume-2 =
; workspaces =======================================
[module/workspaces]
type = internal/xworkspaces
pin-workspaces = false
enable-click = true
enable-scroll = true
format = <label-state>
format-prefix-foreground = ${colors.fg-faded}
label-monitor = %name%
label-active = " "
label-occupied = " "
label-urgent = " "
label-empty=" "
Rofi
Finally after configurig polybar, we need to configure rofi:
~/.config/rofi/config.rasi
configuration {
 modi: "window,drun,ssh,combi,run";
 theme: "solarized";
 combi-modi: "window,drun,ssh";
 show-icons: true;
 terminal: "termite";
}
And your done!